NOTE: For instructions on how to upload a document to SharePoint, visit Microsoft Support at https://go.uwplatt.edu/upload-to-sharepoint
To create an anonymous link from your site in SharePoint Campus Hub
- Navigate to your area's homepage in SharePoint Online at https://uwplatt.sharepoint.com
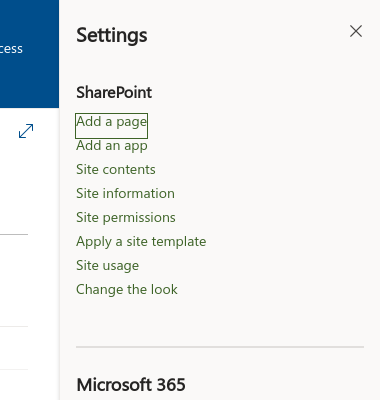
- Click on the gear Settings icon in the upper right hand corner of your area's site and select Site Contents.

- Open Documents.
- Browse to the folder where your files are located.

- Hover your cursor over desired document, and a Share icon will be displayed. Click the Share icon.

- Be certain that the text "Anyone with this link can view" is selected at the top. If not, contact the ITS Help Desk to troubleshoot.
- Click Copy Link button at the bottom of the Share screen to copy the anonymous link. You will provide this link to Marketing in Step 8.

- Submit a request to Marketing through InMotion Lytho and include the anonymous link. Marketing will post the link to the external site (WWW).
To update a document related to an existing anonymous link
If you are updating a document created with an Office application (EX: Word, Excel, or PowerPoint), follow these steps
- Find the existing file in the document library.
- Open an update the document as needed. You may use the online application or the desktop app to make your changes. Do not change the title of the document. NOTE: DO NOT DELETE THE EXISTING DOCUMENT. If you delete the document without updating it, you will break the link on WWW.
- When finished, close the document. Your changes will be saved automatically. You do not need to do anything else. The existing anonymous link will now display the updated document.
If you are updating a PDF, follow these steps
NOTE: PDFs cannot be edited from within SharePoint. DO NOT DELETE THE EXISTING DOCUMENT; this will break the link on the public website. Instead, follow these instructions to edit an existing PDF:
- download the PDF from SharePoint, make changes, and re-upload to the same location using the exact same document title. You will be asked to replace the existing document. Click Add File.
- OR open a doc with the exact same title from another source (such as SHARED1), make changes, and upload to the same SharePoint location. You will be asked to replace the existing document. Click Add File.
To ensure you have updated the existing document (vs replacing it, which will break the anonymous link), check the document's version history by following these steps:
- Open the document you wished to update in SharePoint. Does it look like the same doc only updated? That's your first verification.
- Select Version History at the top of the page; this will display all versions of the document since it was created in SharePoint. Is your updated version listed there with the date and time next to your name?

- If so, then you have successfully updated the PDF document. The link on the external (WWW) webpage will display the newest version of this file.
NOTE: If your new version is not at the top of the Version History list, make sure you uploaded the new copy with the exact same title as the existing doc. Any changes to the title will result in a new document in SharePoint, and the anonymous link will display outdated information.
Need help?
If you have questions, please contact the ITS Help Desk at 608.342.1400 or helpdesk@uwplatt.edu. You may also visit the Help Desk on the first floor of the Karrmann Library.